Homemade Gyro Bread: Serious Flavor in Under An Hour
Imagine biting into a warm, soft, and slightly chewy flatbread, freshly made right in your own kitchen. Now, imagine achieving that deliciousness in less than sixty minutes. This isn't a culinary dream; it's the reality of making your own
homemade gyro bread. Forget bland, store-bought alternatives; this Greek-style flatbread is a game-changer, promising serious flavor and an authentic touch to your meals without consuming your precious time.
Gyro bread is more than just a wrapper; it's an experience. Its inviting texture and delicate taste make it the perfect companion for a myriad of dishes, from the classic savory gyro to an array of Mediterranean delights. The beauty lies in its simplicity: a handful of everyday pantry ingredients are all you need to create these wonderfully versatile flatbreads, transforming your weeknight dinners or weekend gatherings into something truly special.
What Exactly is Gyro Bread? A Culinary Journey
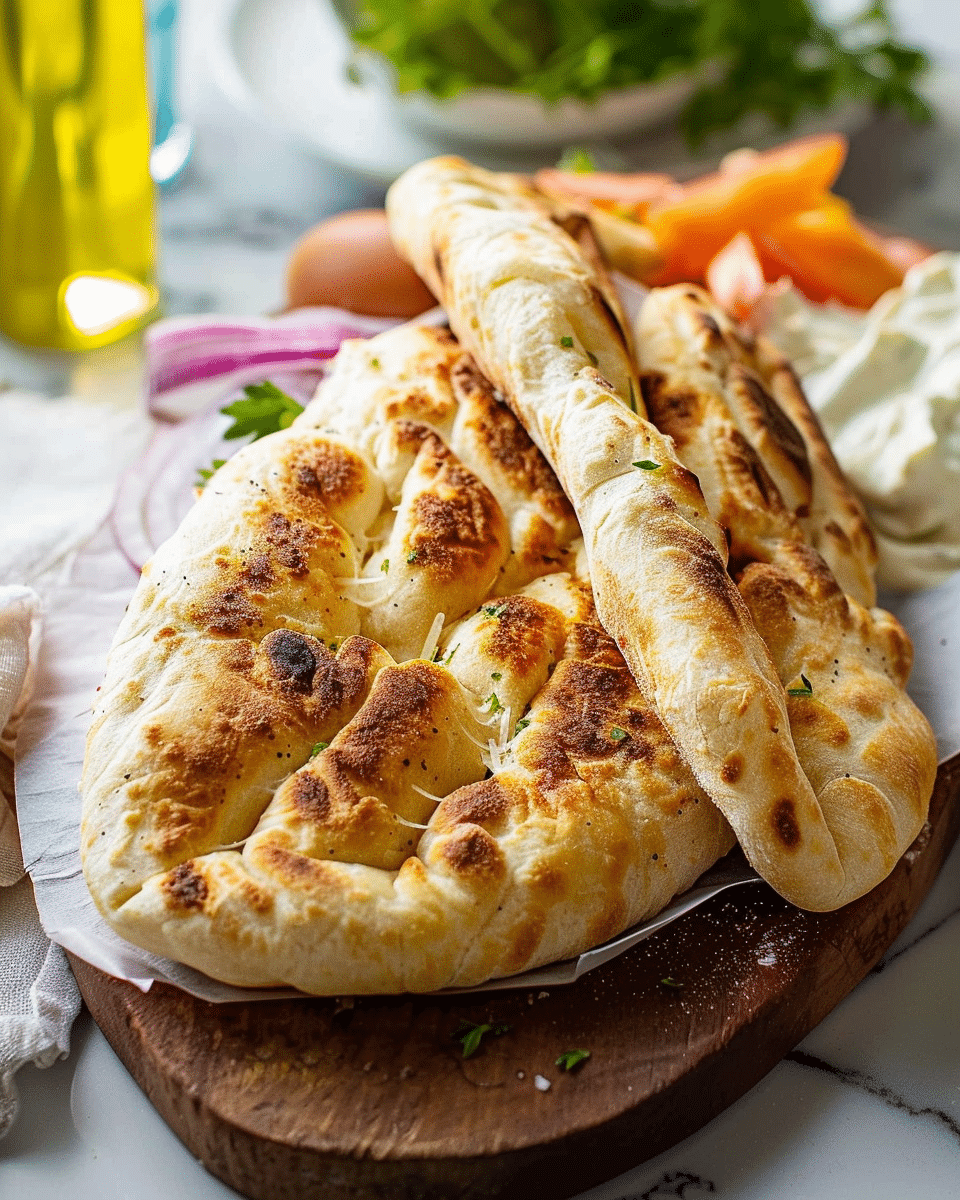
Before diving into the magic of making it, let's clarify what we're talking about. Often pronounced "yee-row" in English-speaking countries, gyro bread is a traditional Greek flatbread, distinct from standard pita due to its typically softer, chewier texture and tendency to be thicker, perfect for soaking up juices and holding generous fillings without tearing. It’s less likely to form a large pocket like some pita varieties and more designed for a comforting embrace of ingredients.
The word "gyro" itself holds a fascinating history, literally meaning "to turn" in Greek. This refers directly to the vertical rotisserie cooking method for the meat that traditionally fills these wraps – a culinary practice believed to have originated in Bursa, Turkey (where it's known as döner) before being introduced to Greece during the population exchanges of the 1920s. Greeks, adapting the enticing style, made it their own, giving us the beloved gyro we know today. This rich heritage underscores the importance of the bread that completes the meal, making it truly authentic. For a deeper dive into its origins and uses, explore
What is Gyro Bread? Explore Its Greek Roots & Uses.
Why Go Homemade? The Unbeatable Advantages
While store shelves offer various flatbreads, nothing compares to the taste and texture of freshly made
homemade gyro bread. The difference is palpable. Here's why making it yourself is worth every minute:
*
Unrivaled Freshness: From the moment it comes off the pan, homemade bread boasts an incredible aroma and a tender, yielding texture that pre-packaged versions simply can't replicate. The subtle nuances of the yeast, the warmth, and the slight chewiness are best experienced straight from your kitchen.
*
Superior Flavor: Simple ingredients combine to create a deeply satisfying taste. Without preservatives or artificial flavors, you get the pure, wholesome essence of a classic Greek flatbread. This clean slate allows your fillings to shine while providing a delicious base.
*
Control Over Ingredients: Making it from scratch puts you in charge. You know exactly what goes into your bread, making it a great option for those with dietary concerns or a desire for cleaner eating.
*
Surprisingly Quick & Easy: The biggest misconception is that bread-making is time-consuming. Gyro bread defies this notion. With minimal kneading and a short rise time, you can have a stack of warm flatbreads ready in under an hour, making it an ideal choice even on busy weeknights.
Crafting Your Gyro Bread: A Quick & Simple Process
The magic of creating this flavorful bread in under an hour lies in a streamlined process and a clever choice of ingredients. You won't need a stand mixer, though it can certainly speed things up. A simple bowl and your hands are perfectly sufficient.
The foundational ingredients are basic: flour, water, yeast, a touch of sugar (to activate the yeast), salt, and olive oil for richness and flexibility.
1.
Activate the Yeast: Begin by combining warm water, sugar, and yeast. A short wait allows the yeast to bloom, indicating it's active and ready to work its leavening wonders.
2.
Mix and Knead: Gradually add flour and salt to the yeast mixture, bringing it together to form a shaggy dough. A quick knead – just 5-7 minutes by hand or less in a mixer – develops the gluten sufficiently for that soft, chewy texture without making it tough. The dough should be smooth and elastic.
3.
Short Rise: Unlike many traditional bread recipes that demand hours of proofing,
homemade gyro bread only needs a brief rest, typically 15-20 minutes. This allows the gluten to relax and the yeast to begin its work, contributing to the bread's characteristic tenderness.
4.
Divide and Roll: Divide the dough into equal portions and roll each into a thin, round flatbread. Aim for about 1/4 to 1/8 inch thickness. Don't worry about perfect circles; rustic charm is part of the appeal!
5.
Quick Cook: This is where the speed truly comes in. Cook each flatbread on a hot, dry skillet or cast-iron pan for just 1-2 minutes per side. You'll watch them puff up slightly, develop beautiful golden-brown spots, and emerge soft and pliable. Stack them as they cook, perhaps brushing with a little olive oil or melted butter for extra flavor and shine.
And just like that, you've transformed simple ingredients into a stack of warm, inviting
gyro bread, ready to be enjoyed.
Unleashing Its Versatility: Beyond the Traditional Gyro
While pairing your homemade bread with classic rotisserie meat, fresh tomatoes, onions, lettuce, and a generous dollop of creamy tzatziki is an absolute must-try, the potential of
homemade gyro bread extends far beyond the traditional gyro. Its soft, pliable nature makes it incredibly versatile, transforming any meal into an exciting culinary adventure.
Consider these inspiring ideas:
*
Dipping Delight: Serve warm gyro bread alongside your favorite dips like hummus, baba ghanoush, or a vibrant feta dip. Its sturdy yet soft texture is perfect for scooping.
*
Mediterranean Mezze: Elevate your appetizer spread by using it as part of a Mediterranean mezze platter, complementing olives, cheeses, dolmades, and various spreads.
*
Creative Wraps & Sandwiches: From a simple turkey and cheese to a more elaborate grilled chicken Caesar wrap, this bread is a fantastic alternative to tortillas or sandwich bread. Think breakfast wraps with scrambled eggs and avocado, or even a novel peanut butter and jelly experience.
*
Pizza Base: Lightly toast a piece, spread with sauce, cheese, and your favorite toppings for a quick personal pizza.
*
Meal Prep Powerhouse: Make a batch at the beginning of the week and use it to create different wraps each day. Stuff with a variety of fillings – from savory falafel and fresh veggies to a fragrant Greek yogurt chicken salad – to keep your lunches exciting. This flatbread is an absolute lifesaver for structured and delicious meal planning. Discover more ways to incorporate it into your routine with
Unlock Flavor: The Versatility & Meal Prep Power of Gyro Bread.
Hosting a "Make Your Own Gyro" party is another fantastic way to leverage this homemade bread. Lay out various fillings – different meats (beef, lamb, chicken, falafel), an array of fresh vegetables, and diverse sauces – and let your guests unleash their creativity. It's an interactive and delicious way to gather!
Dietary Considerations and Healthy Pairings
While
gyro bread itself is a simple carbohydrate, it can absolutely be part of a well-balanced diet, especially when paired thoughtfully. The beauty of homemade bread is knowing exactly what's inside. It contains a small amount of protein from the flour and yeast.
To boost the nutritional value of your meal, consider:
*
Fiber-Rich Fillings: Load your wraps with plenty of fresh vegetables like lettuce, tomatoes, cucumbers, and onions.
*
Lean Proteins: Opt for grilled chicken, lean beef, lamb, or plant-based proteins like falafel or chickpeas.
*
Healthy Fats: A drizzle of olive oil or a side of avocado can add beneficial monounsaturated fats.
*
Gluten-Free Options: If you or your guests have wheat allergies, you can successfully make gyro bread using a gluten-free all-purpose flour blend. For best results and to ensure the dough binds well and achieves a satisfying texture, look for a blend that includes xanthan gum.
Storing and Reheating Your Homemade Gyro Bread
One of the great advantages of making a batch of
homemade gyro bread is its excellent shelf life and ease of storage.
*
Refrigeration: Once cooled completely, stack the flatbreads and store them in an airtight container or tightly wrapped in plastic wrap in the fridge for 3-5 days.
*
Freezing: For longer storage, flash-freeze the individual flatbreads on a baking sheet until firm, then transfer them to a freezer-safe bag or container. They will keep well for up to 3 months. Thaw frozen bread overnight in the fridge before reheating.
*
Reheating: To restore that freshly made warmth and softness, you have a few options:
*
Oven: Preheat your oven to 350°F (175°C) and warm the bread for 5-10 minutes, or until soft and pliable. Wrapping them in foil can help prevent drying out.
*
Skillet: A quick reheat on a dry, hot skillet for 30 seconds to 1 minute per side works wonders.
*
Microwave: For a super-fast option, a few seconds in the microwave can soften them, though this method might make them a little chewier.
Conclusion
There's an undeniable satisfaction that comes with creating something delicious from scratch, especially when it's as quick and rewarding as
homemade gyro bread. This simple Greek flatbread delivers incredible flavor, versatility, and the comforting warmth of a home-cooked meal, all in under an hour. Whether you're assembling a traditional gyro, scooping up your favorite dip, or experimenting with creative new wraps, making your own gyro bread elevates the experience to a whole new level. So, clear your counter, gather your ingredients, and prepare to impress your taste buds – and your guests – with this seriously delicious and surprisingly easy culinary triumph.